Homemade Lens
Home | Photography | Projects
In 1994, I made my own 900 mm lens. Here’s a writeup I posted on an internet photography group. At the end are some pictures taken with the lens, and some followup information I wrote in response to questions people sent in. At the bottom of this (very long) page is an exploded mechanical drawing of the lens.
Hello rec.photographers,
Yes, I really have made my own 900 mm lens. I thought the readers of rec.photo.advanced might be interested in a little writeup.
First, the good news: The lens is very sharp, virtually distortion-free, and has zero chromatic aberration. It will focus anywhere from 12 feet to infinity, and I built the whole thing for under $300.00.
And now the bad news: It weighs 23 pounds, is 7 inches in diameter and over 5 feet long, and has a fixed aperture of about f/11. Also, being a mirror lens, it has the usual mirror lens funnies in out-of-focus areas of the picture.
But the other good news is that the pictures taken with it look pretty darned good.
This all started one weekend last May. I was hiking at Pawnee Buttes in northeast Colorado, and tried to get some shots of a ground squirrel. But my Canon EOS 75-300/4-5.6 just wasn't long enough and I wasn't able to get close enough. On the way home, I spotted an antelope in the grassland near the road. But again, he was too far away for much of a shot, other than a snapshot to prove I saw him. The next day, at a bird sanctuary, I wasn't quite able to get close enough to a yellow-headed blackbird perched on a cattail.
So I got on the net and looked up the Canon EOS faq, and went over my options for more focal length. A teleconverter would be the cheapest, but since I don't have the greatest or fastest lenses to start with, I think I would be disappointed. I could go for the 300/4 with an extender, but then I'd just wish I had the 300/2.8 with an extender, and that would cost more than all the rest of my camera equipment combined. Of course a 600/4 would be great, now were talking real money.
So I got to thinking whether I could make something. I'm something of a tinkerer, and saw this as a chance to learn a little more about optics. In my job I work with people who are optical experts, but I'm not one myself. I thought it couldn't hurt to pick up a little more optical knowledge.
I have no way to grind glass, so I got out the Edmund Scientific catalog to look at what stock components might be available. They have a variety of large mirrors, and that's what I started with. I'd been working on a little ray-tracing program anyway, so I set up a model using a 36-inch focal length f/6 spherical reflector. Thirty-six inches is about 914 mm, which seemed like enough length, and because a camera requires a field of view that includes off-axis areas, I needed a large enough mirror that after it was stopped down some, it could still have a reasonable aperture.
By the way, the mirror part number in the Edmund Scientific catalog is J32,842, and it lists for $181.20. You can also get an enhanced aluminum version (J43,566) for $240.20. They'll take a credit card number and ship the mirror right to your door. It's almost like ordering a pizza.
The ray tracing looked pretty good. At f/11 and focused far away, I estimate a maximum spot size on the film of about 16 microns. This compares very favorably with Ansel Adams' statement that spot size should be less than 1/1000th of an inch, which is 25.4 microns. I'm also told that most camera lenses have a sharpness of about "30/30", or 30 percent modulation at 30 line pairs per millimeter on the film. (See some of the recent discussions of Modulation Transfer Function.) My analysis showed that (depending on the quality of the mirror) the lens should be at least that good. One of our optical engineers here at work also looked at it with a commercial ray tracing program and agreed. Of course, this all depends on the quality of the mirror.
Why a spherical mirror? Why not parabolic? Well, the honest answer is that I tried a spherical model first because I already had the equations worked out for reflecting rays off of spherical surfaces. When that looked good enough, I just stopped there. But since then, I have worked out the formulas for tracing rays off a paraboloid. As expected, the on-axis performance is quite a bit better. But the off-axis performance is quite a bit worse. So all in all, I think I'm better off with the spherical mirror after all.
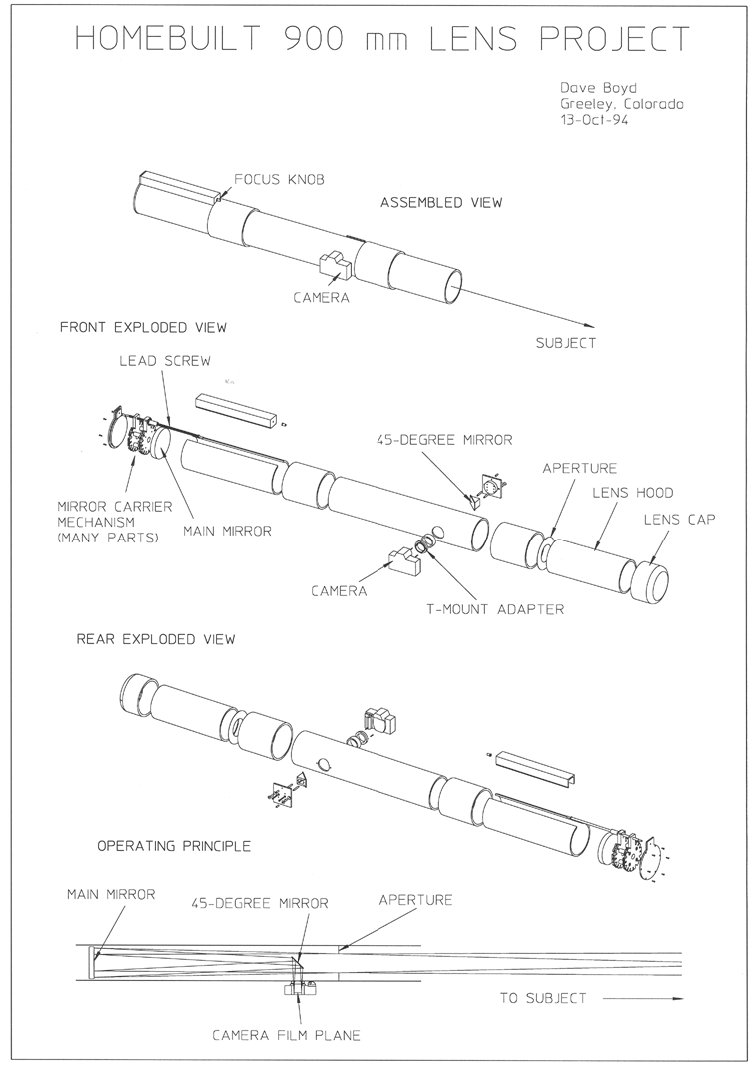
The layout of the lens is something like a reflecting telescope. The main mirror is in the back, and then a flat mirror is mounted in the middle of the tube at a 45 degree angle, and the camera looks in from the side. I scrounged a good quality first-surface flat mirror from some parts left over from a former work project. The mirror sits in the optical path and occludes part of it, which is what causes the out- of-focus effects. It also reduces the light transmission a little.
One significant way my lens differs from a telescope is that the main mirror is movable for focusing over a wide range. In order to get a good close-focus distance, I had to provide for about 8 inches of focus travel. I also learned that the focus distance versus focus travel relationship is very nonlinear. As the closest-focus distance gets very short, the focus travel grows very rapidly. So I can focus from infinity down to 12 feet with about 8 inches of travel. If I wanted to focus down to 6 feet, I would need much more than 8 inches of travel.
Another tradeoff to be made was the location of the aperture. Placing the aperture at the center of the mirror sphere appears to make for the best sharpness. But a 36-inch focal length mirror has a radius of 72 inches, and that would make the lens really long. Also, the farther the aperture is from the mirror, the greater the area of the mirror that is used, and therefore more vignetting will happen or the aperture size will have to be reduced. Placing the aperture at the center of the sphere also would be a problem as focus was adjusted. To keep the aperture and mirror a fixed distance apart, the camera would have to move for focusing, and that seemed awkward mechanically.
I decided that vignetting was bad, and lens length was bad, and that the sharpness tradeoff wasn't too bad, so I placed the aperture about 6 inches in front of the camera. Its distance from the mirror depends on where the main mirror is in its focus travel.
Now that I had an optical design, I had to figure out how to make it mechanically. In real life, I'm [I was] a mechanical designer for Hewlett-Packard, so I just sat down at the 3D CAD system and went at it.
The lens barrel is made of 6-inch black ABS plastic pipe. I made a focusing mechanism out of a leadscrew and some bearings from a Hewlett-Packard optical disk autochanger. One interesting problem in the design was figuring out how to place the focus knob close enough to the camera so that you could even reach it while looking through the viewfinder. I found a way, but the leadscrew is outside the diameter of the pipe in a sort of rectangular protuberance.
Another problem was how to mount the 45-degree mirror and the camera so they were in good alignment with each other. There again, I found a way, but it required borrowing some special machining tools from our model shop machinists.
After all the parts were designed, I spent several evenings in the machine shop making all the special parts. The requirement that I be able to make the parts myself (with my limited machining skills) put some added constraints on the design of the parts.
To attach the camera, I just bought a T-mount adapter for the EOS lens mount. I had to modify it a little to open up the hole in the center so that it wouldn't vignette. Incidentally, the 45-degree mirror is rectangular, rather than elliptical as in a telescope. The reason is that the field of view needs to be rectangular to cover the whole frame. A telescope needs only a circular field of view. It would be possible to cut my mirror down a little and make it trapezoidal shaped, as some of the rectangle isn't really used now. That would make it obstruct slightly less of the aperture, but it hasn't seemed necessary.
The barrel is made in three sections. The main mirror and focusing mechanism are in a section that's a about 20 inches long. The camera mount and 45-degree mirror are in another section about 32 inches long. The aperture mounts on the end of that, and then another section attaches with a coupling. The last section is about 15 inches long and is simply a lens hood. Would you believe that a coupling for 6-inch ABS plastic pipe costs $16.00?
It was quite exciting to put it all together for the first time and look through the viewfinder. The lens gives a correct image - it's not upside down or anything.
But the first few pictures were pretty bad. The contrast was terrible. I determined that the problem was stray reflections off of the inside of the pipe. Even though the pipe is very black, the inside surface is very shiny - almost mirror-like.
The solution turned out to be very simple. At first I thought I'd have to design some elaborate baffles to kill the stray reflections. But it turns out that simply painting the inside of the pipe a very flat black was good enough. I used Krylon Ultra-Flat Black spray paint.
Getting the correct exposure is also interesting. In the EOS system, apparently the lens tells the camera what its maximum aperture is. The camera uses that in its metering calculations, and then calculates what shutter speed will be necessary at the aperture that will be used to make the exposure.
But my lens doesn't tell the camera anything. What I've discovered is that in the absence of data, the camera assumes an f/1.0 lens. So to get the correct exposure, I put the camera in aperture-priority mode and set it for f/1.0. Then the automatic metering works and the camera picks the correct shutter speed. In manual mode, I would also have to leave the aperture set at 1.0.
And now the pictures look pretty good. I went out a couple of weekends ago to try it out. It's a little awkward to use, but I've got some techniques that help. I don't think my Bogen 3001 is up to holding this lens steady, so I bought a bean-bag chair to use as a lens rest. It actually works pretty well propped on the tailgate of my pickup truck, or even plopped down on the grass. I'm learning to look through the viewfinder, hold a cable release in one hand, keep the other hand on the focus knob, and maneuver the whole thing with both hands. And if I take the lens hood section off, I can carry everything in the cab of the truck rather than in the back.
So I'm calling the whole project a success. I've got a workable (if awkward) 900 mm lens, I only spent $300 on it, and I learned a whole lot in the process.
And what's next? I suppose I could put a motor on it to turn the focus knob. It's pretty slow right now to move from close-focus to infinity or back. And then once the motor is there, maybe I could decode the command signals coming from the camera and make it auto-focus! I suspect that at f/11, this would only have a prayer of working in very bright sunlight.
Or I suppose I could figure out how to have the lens tell the camera it's a fixed-aperture f/11 lens, so I wouldn't have to remember to lie to the metering system. But as things are now, I can interchange apertures to get a little adjustment, so I think I'll leave the metering situation as it is.
Or I could build a mongo tripod out of 2 by 4's.
But for awhile, I think I'll just play with it and see what seems important.
And now, as a reward for those who've read all the way through this long posting, here's an offer. If you'll email me your regular mailing address, I'll send you some photos of the lens itself, as well as a couple of pictures that were taken with it. I'll do this at my expense for U.S. residents if there aren't too many requests. If you're outside the U.S., then email me and we can make some kind of arrangements.
It will take at least a couple of weeks to send out anything because I want to catch the next full moon to be one of the pictures.
Later,
 Dave Boyd
 Greeley, Colorado
P.S. Come to think of it, maybe I'll get that teleconverter anyway. Surely I can think of some use for an 1800mm f/22 lens!
And here are the pictures that are mentioned in the writeup. I received about 30 requests for pictures, from four countries.
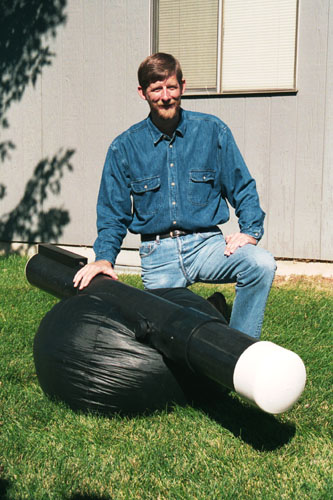
Here is a picture of me with the homemade lens.
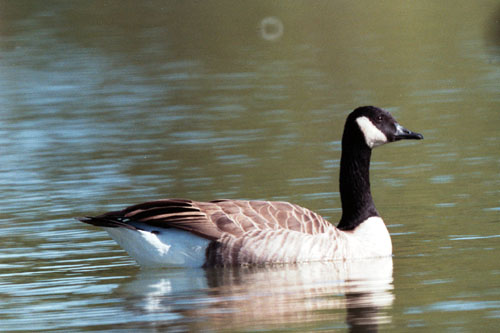
This Canada goose was at a park in Greeley. Note the out-of-focus highlight near the top center of the picture.
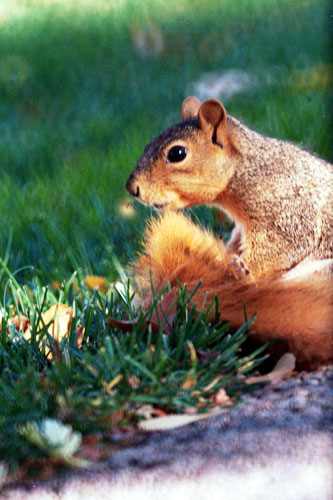
This squirrel was at a different park in Greeley.
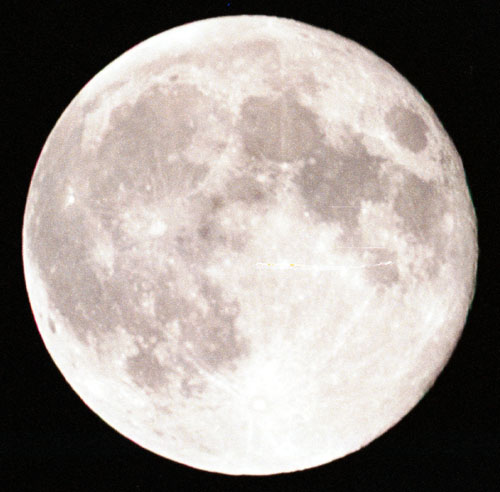
This picture of the moon was taken on Ektar 25 film. I had trouble keeping the scanner from blowing out the light parts, but I think you get an idea of the sharpness.
Focusing with this lens on my camera is difficult because the viewfinder doesn’t provide any focusing aids. (The camera is ususally used with autofocus lenses.) There could be some motion blur in this picture as well.
Here is the first of some followup messages I posted answering questions and such.
Hello,
This message is going to everyone who's emailed me about my homebuilt 900 mm lens project that I discussed on rec.photo.advanced. Thanks for the response. I've heard from about 25 people. That's a large enough number to be gratifying, but also a small enough number that I'll be able to send some prints to everyone who's asked. (So far anyway.)
By the way, at least two of you have asked for photos but didn't include your mailing addresses. If that's you, please save me some time and send me another message. Otherwise I'll have to contact each of you individually.
I thought I'd also answer some of the questions and comments that I've gotten so far. Here goes:
1. How about sending some engineering drawings of the parts?
I will be able to send some exploded isometric views, but I've decided that there wouldn't be much value in sending detailed drawings of the parts. The parts were designed to specifically match the tools I have available, the materials at hand, and my fabrication skills. The chances of my design details being the right solution for anyone else are pretty small. I think my sketches will give you enough detail that you could make up your own design if you want to.
2. What would it take to make the lens faster, say, f/8 or so rather than f/11?
I did a little more ray tracing on this one. At f/8, the maximum spot size grows to about 34 microns (compared with 16 microns at f/11). I'm a little unclear on just how spot size relates to MTF, but clearly the lens would be less sharp at f/8. It's easy to make another aperture and try it out, so maybe someday I'll get a chance to find out.
I do know that resolution is related to the distribution of the rays inside the spot, so just knowing the maximum spot size is only an approximation at understanding the resolution.
The other problem is that the edges of the picture will almost certainly vignette at f/8, especially at close focus distances. But I estimate that at 50 yards or more, the effect won't be noticeable.
3. How about scanning the photos and exchanging the electronically
 instead of using the U.S. Mail?
I do have access to scanners (My job at HP is mechanical design of scanners. I designed some of the internal parts of the ScanJet IIc and ScanJet IIcx.), so I can create good image files. But I'd need some instruction about where would be an appropriate place to post large files. The file would have to be quite large to even begin to represent the detail you can see on a 3X5 print. I'd estimate four megabytes or so.
Also, for security reasons, my workstation isn't accessible on the open net for ftp transfers. I don't think it's practical to email such large files. Maybe someone else can offer to be the ftp server?
Anyway, you can probably tell that even though I know how to make the files, I'm hazy on the internet techniques and etiquette involved in exchanging them. Please feel free to educate me.
4. What kind of ray-tracing software did you use?
I used a program I wrote myself for work. Had I known it would grow to what it is, I would have bought a commercial program, but originally I was just trying to model some rays bouncing off of flat mirrors. Eventually, I worked out the formulas for reflection and refraction off of and through flat surfaces, cylinders, spheres, toruses (tori?), and even some aspheric shapes. I can also do some automated optimization.
As with most homebrew software, it's probably not usable by anybody but me.
5. What special tools were needed to make the lens?
Mostly I used standard machine-shop stuff. All the parts were made on either a lathe or milling machine. I did use two different lathes for the large and small parts. Probably the trickiest thing was boring a 62mm diameter hole all the way through the six-inch pipe. I had to do it all from one side so that the pieces mounted on the two sides would be in good alignment. I had to ask several machinists before I found a boring bar long enough.
6. Is the performance of the lens limited by design or by the mirror
 quality?
All of the performance information I've given is for a perfect mirror. I haven't made any serious efforts to model mirror imperfections. The Edmund catalog says the mirror is "1/4 wave", which sounds pretty good to me.
The problem with modeling mirror imperfections is that the magnitude of the imperfection isn't the important thing. The important thing is the slope of the deviation from perfect. I suppose I could try to estimate the curvature induced if the worst-case 1/4 wave deviation happened in a one-inch traverse across the mirror, and then model a mirror with that curvature. I think it's also possible to characterize a surface on an interferometer and input that data into some commercial ray-tracing packages. But that sounds more serious than I feel like getting.
7. How can the image quality be any good with just a single-element system? (That's paraphrased a little.)
The key here is the small aperture. Spherical aberration grows dramatically as the aperture increases, and I understand that the other aberrations are also very sensitive to it. The narrow field angle due to the long focal length also helps.
8. Do you have any plans to market this lens or plans for it?
I doubt that would be practical, given the labor-intensive nature of it and the almost-certainly-small market. I did it for fun.
So there you have it. My plan is to get some good shots of the upcoming full moon, and get stuff mailed out within two or three weeks of that.
Thanks for your interest,
 Dave Boyd
 Greeley, Colorado
Here is the last followup message.
Hello again,
Now that the prints I sent out of pictures taken with my homebuilt 900mm lens are arriving at their destinations, several people have emailed further questions. Rather than answer individually, I thought I'd compile them all and send them to everybody in case others might be interested. Here goes.
1. By the way--the catchlight on the squirrel is a rectangle instead of a spot. Is this an artifact of the shape of the mirror reflector, or shutter resonance/camera movement/(probably not)mirror slap?
A. Of course, the first question has to be one I don't know the answer to! I hadn't noticed this, and can only speculate on the cause. I doubt that it's an artifact of the mirror shapes because it's in focus. And it seems like camera movement would have blurred other features of the picture into similar shapes. Maybe squirrels have some unique eye structure? My best guess is that it's a reflection of something behind the lens that's simply rectangular shaped. The picture was taken late in the afternoon in a park with lots of trees, with the low sun almost directly behind the lens. It's quite possible that the sun was shining through a nearly-rectangular opening in the trees. But I'm willing to listen to better explanations.
2. What films were used? Were these snapshot prints or more carefully
controlled? What paper?
A. The squirrel and goose were on Kodak Gold 200 and were snapshot prints. I had them reprinted through the local grocery store. Of course, I picked shots that had printed well in the initial develop/print step (which was also done through the same place).
The moon was shot on Ektar 25 and originally sent through the grocery store dropoff for developing and printing. The reprints you got were done at a knowledgable 1-hour place. I gave them several negatives to choose from, and we did three trial prints before settling on the settings used to make the multiple copies.
In both cases, you know as much as I do about the paper. The squirrel, goose, and lens pictures just say "Kodak Paper" in the back. The moon picture says "Konica Long Life 100".
Oh, and I should remind you that the moon picture reprints were four-by-six prints that I trimmed down for mailing. So the size of the moon relative to the frame size is slightly exaggerated.
3. It looks like the goose picture also suffers from a fair amount of flare in the upper right third of the pic; that whole section looks washed out. Am I right? I know you said you initially had problems with flare...
A. I don't think it's flare. I think it's the reflection of brown and gold trees and grass across the water and out of the picture. I haven't noticed flare problems in any shots yet.
But that does give me the chance to point out another artifact I forgot to mention before and whose cause I have no clue about. In the far upper right of the goose picture is a dark semicircle, as if someone had grasped the print there with a greasy thumb. I've noticed this on several pictures. The negatives show it, and only negatives taken with this lens. So it's not in the camera and it's not in the printing. It must be an artifact of my lens, but I don't know what it is. It also shows up in the upper left corner of the frame, but the goose picture happens to be cropped so that you only see it in the upper right. Any ideas?
I expect this to be my last general communication about this project. Thanks for all your interest. I've heard from over 30 people, including people in Canada, Finland, and Portugal. I have no idea how many people might have tried to retrieve the electronic images. It's been a lot of fun finding out there are other people in the world who think this kind of stuff is neat.
Anyway, thanks for your interest. We'll probably meet again on rec.photo.advanced.
 Dave Boyd
 Greeley, Colorado
And finally, here is an exploded mechanical drawing of the lens.